Monday, March 14, 2011

Ranchy Crackers

I know I said I was going to try to post once every single day for an entire year. But I don't want to do that. Now, I'm not giving up on my project. I'm still going to post. I'm just not going to try and crank out posts that are just meaningless dribble. I want to post things because I want to post them. Not because I need filler.

Today, I have an awesome recipe that I want to share. I figure, because Mondays are usually my productive and experimental cooking days, that I would try to post recipes on Mondays. My stomach and I are pretty excited about this.

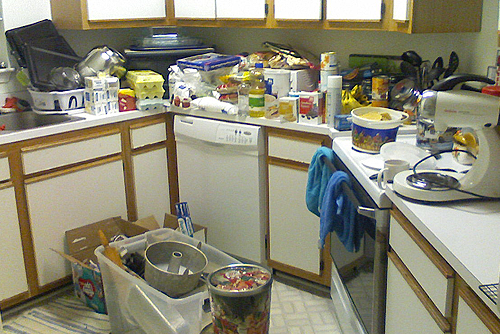
To start off the post, let me tell you all a little story. My roommate's mother, Momma Kathy, morphs into a Keebler Elf when Christmas time comes around. Part of me wishes I was joking, but the part of me that loves cookies doesn't. She makes container after container of cookies. Chocolate chip, mint, pressed, you name it, she makes it. Well, this last Christmas, MK decided to turn our teeny tiny kitchen into her tree house bakery. 

For the first time in my life, I feel that there was enough butter in one room that even Paula Deen would be happy.

Anyways, one of the things she made that wasn't cookies were these crackers. Like, I could eat them all day. And, in fact, I did when I got home from visiting my family in Virginia. I decided to give the recipe a go. 

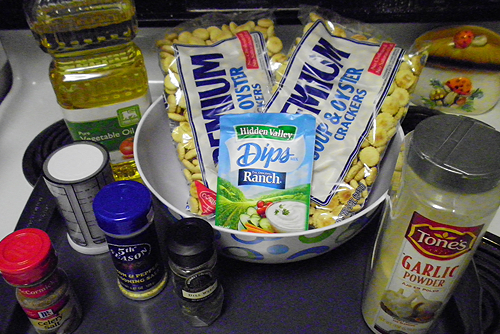
Start off with the ingredients. Oyster crackers, vegetable oil, ranch mix, garlic powder, lemon and pepper seasoning, dried dill, and celery salt. 

I have made chex mix before and always needed to mix it all in the big bowl and THEN transfer it to the baking sheet, so I was all ready with the big plastic bowl. Only to read the rest of the directions and realize I didn't need the big bowl after all. 

Instead, you pour the crackers on the baking sheet and then set it aside. Or, in my case, you set it farther back on the stove top.

In a MUCH smaller bowl than the one I pictured before, mix the seasonings with one cup of oil. I used one of the many wisks in the kitchen to do this. Once it looks good, spread the mixture on the crackers.

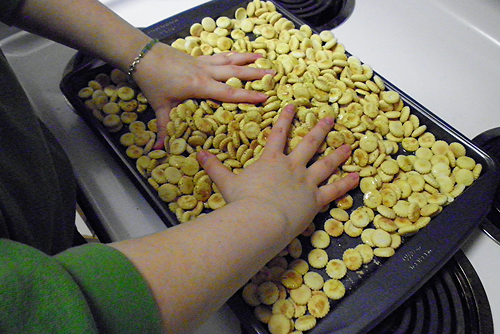
Then wash your hands again, because you will be mixing the crackers with the seasonings and the best way to get them coated is with your hands. This is where roommates come in handy because she was snapping the pictures. 

There WILL be some causalities. Don't worry about it. I know I had many a man down myself. Again, this is where roommates come in handy, cause Marie scooped those right on up. Once it all looks good and coated, put the baking sheet in the oven at 250 for 7 and a half minutes.

Meanwhile, make a peanut butter and banana sandwich for you and your roommate. This step is, of course, optional, but I feel you won't regret it. 

At the 7 and a half minute mark, take the crackers out and mix them up before putting them back in for another 7 and a half minutes. 

Once your time is up, take them out and let them cool. Then enjoy! :D

Ranchy Crackers:
- 16-20 oz of oyster crackers
- 1 cup of oil
- 1 package of original ranch mix
- 1 tsp of Dill
- 1tsp Lemon Pepper seasoning
- 1 tsp Garlic Powder
- 3/4 tsp Celery Salt

-Preheat Oven to 250 degrees.
-Mix seasonings with oil.
- Spread crackers on a cookie sheet.
-Spread oil and seasoning mixture over crackers. Mix with hands.
-Bake for 15 minutes, stirring halfway.
- Cool and enjoy.
-Store in an airtight container.


Thursday, March 10, 2011

Totally Nailed It Vol.1

Those that know me know that I really enjoy doing nails. I also really enjoy doing nail art! :D That being said, I want to incorporate it more in my blog posts. I mean, why not? Its still a pretty crafty thing, right? It has art in the name. 

So, I decided to share with you some of my favorite designs that I've done so far. 

These are cherry blossoms painted in acrylic paint on China Glaze Refresh-mint. I think it looks like the Arizona tea cans.

These were the first set of acrylic nails I put on. I decorated them with green tips, red swipey bits, while dots, and snow flakes. 

These are my award winning nails! Yes, that's right. I got first place in a nail art competition with these babies. They are pink and white with silver bows on all fingers by the ring finger. On the ring finger is a houndstooth design. One of the judges (who looked like David Bowie) said they were very wearable. 

Blue nails with a white diagonal break. Then turned into zebra print. These looked sooo good on.

Olive green nails with gold tips. The ring finger was decorated with a peacock feather. This picture does NOT do this design justice. It was so pretty.

So, there's a little taste. You will be seeing much more of these in the future, I can guarantee it.

Wednesday, March 9, 2011

Fabric swap!

So, last month I signed up for my first fabric swap. It was organized by Beth at The Patchwork Chronicles.

I am not gonna lie, I was pretty nervous about what fabrics I would get, but I feel pretty good about mine. I already have some ideas of what I want to do. Now I just need to get to doing them. 

I told my swap partner that I like vintage inspired prints and bright and fun prints. I think I got both, don't you? 

So, I decided to make something with my swap tonight before posting. I've been eyeballing the Pom Pom necklace tutorial at Little Miss Momma for a good while now and decided to try it out with the forget-me-not fabric. So, I cut them all out and then didn't feel like making more than one because I wasn't sure how I liked this fabric for the project. So I finished one then made a yellow rosette. I had no idea what to do with them, so I just slapped them on some felt with a white felt rosette, tossed on some netting and a pin back and called it a day. 

Now I have this pin. I think it looks a bit tacky, but it isn't too bad, right?


Right?

Tuesday, March 8, 2011

Makin' Lemonade

So, as well all know, I am none too pleased with my crafting armiore. Well, that's a lie. I am somewhat pleased with it. It does what I need it to do and it doesn't look TERRIBLE. I'm just perturbed with it. And disspointed. That being said, I'm trying to make lemonade from this very obviously a lemon kind of a situation.
I kept looking at the doors to the unit as they sat open with the table out from where I didn't put it up last week. All I could see were the bare, off white of it all. 
See what I mean? Just boring old doors. 

Then, I started looking at them closer. They had this area that just screamed at me that it needed something. And I knew just what that something was.


CORK!!!

I made a stop at Wal-Mart today and picked up two packages of 4 12x12 cork boards. I brought them home and measured it all out. All I had to take off was one inch on one side for it to fit. 

So, I did! Of course, the first time around I took a little less than an inch and then had to go back and fix it. But we won't talk about that sliver of cork. 

I used the included mounting tape on the cork and placed it in its new home. Sadly, I had a dumb moment and opened both packages of cork and marked each one before I realized that I only really needed the one package. I placed two 11x12 rectangles in each door at the top, and then half way down, I used the extra one inch cork remnant. I had to trim off an extra inch on the end to get it to fit, so I was left with another little bit. So I used that, too!

I think the end result looks pretty good, if I do say so myself. It was a nice little DIY project with functionality. Which, I'm learning as I get older, is a good thing. 

I like this unit a little bit more, now. I think my next step is fun hardware for the doors that I can purchase from a neat little antique place in town. I'm just trying to decide if I want to do that now, or wait until Amber and Jamie come in to visit me and do it with them.

But, I will say this. While I love me some Dollar Tree...I'm not loving the rulers that I got from there. The edges are a bit...well, wobbly. I don't feel like they drew a straight line at all. Looks like there's something else that I need to add to my Birthday wish list.

Monday, March 7, 2011

Birthday List!

So....My birthday will be coming up soon. I will be 27 on March 22. It's kind of crazy to sit back and realize that you're getting older. Especially when I don't feel like I'm about to be 27. I still feel like I'm 24. You'd be amazed the number of people that are surprised when they find out that I'm 26. Not that I'm complaining. Its rather nice, really. As for my Birthday plans? Well, I'll be working on the actual day. Every year since I moved in with my awesome roommate, we've had a movie marathon night the weekend of my Birthday. And this year, two of my BFFs will be coming to see me the weekend after my Birthday! I'm pretty stoked about this. 

The other day, a friend of mine asked me what I wanted for my Birthday. I'm always sooo bad about answering that. It's about right up there with pricing my craftybits or saying how much to pay me for baby sitting. So, this time I decided to sit down and think about it. What WOULD I like for my Birthday?

So here's my list :D


For Christmas, my awesome Roommate got me these AMAZING measuring cups that I absolutely adore. 

Aren't they ridiculously adorable?! They are seriously one of my favorite things in the kitchen right now. And I'm trying not to fall too terribly in love with nesting dolls right now. That's a hobby I don't need at the moment. But my goodness, the cuteness kills. 

But...I figured I might as well complete the set, right? And these nesting measuring spoons would be PERFECT with my cups. You can find them both at Perpetual Kid Website.

I'm a huge dork. Like....a HUGE dork. I'm totally the Eric Foreman of my group of friends. But that's ok, because I wear that badge proudly. That being said....I FRICKEN LOVE DOCTOR WHO! Like, for reals. 10 will ALWAYS be MY Doctor, but I'm enjoying 11. But one thing that I love is that no matter how many times the Doctor regenerates, the outside of the Tardis ALWAYS stays the same. And this mug would make me squeal with delight and hum the them song as I drank delicious beverages or placed it somewhere to decorate and proclaim my nerdiness.

To continue on with my nerdiness, is Season 4 of "The IT Crowd". Because this show is seriously amazeballs. If you haven't seen it yet, you can on Netflix instant. It is seriously an amazing BritCom and if anyone works with/in IT, then you will giggle even more, I'm sure. 

This Sterling Silver Hydrangea Cluster Necklace is something that I'm coveting more than I am genuinely asking for. Why is that? Because this beauty is $158 and I can't ask anyone to spend that kind of money on me like that. But oh, so beautiful is this necklace?! Its just so sweet and delicate. Quite dreamy, I think.

Anyone that knows me knows that I love The Mummy movies. Well, all but that third one that came out a few years ago that I still refuse to believe was a part of the same franchise. Anyhoo, I love The character Evy and I love Rachel Weisz, who plays her. And I LOVE her locket. I'm always on the look out for a locket like hers in the movies. This locket is similar, but the anchor in the middle is definitely not in the design. But you have to agree, its really cute! I'm really getting into the nautical stuff lately. It must be the beach. 


But what I really want...is a DQ Ice Cream Cake. What? They are delicious!

Sunday, March 6, 2011

Let's get ready to rumble!

Or grumble. Whatever. 
 Get yo popcorn ready, gurl. Cause its gonna be a big post.

For those of you that are my friend on facebook, you know all about how much I wanted a crafting armiore. For those of you that are new to this blog. Well, I really wanted a crafting armiore. I started saving my tips and searching the internets for one and finally found one that had been getting some really nice and recent reviews. So, I settled on This One. I even purchased it on Walmart.com because it was going to be cheaper than amazon.

The reviews looked awesome. Out of 20, 17 were 5 stars! There were no 2 or 1 star reviews. Seriously, it was looking pretty good to me. So, I purchased it and waited for it to get here. The nice men that delivered it brought it in the house and left it in the front hallway. The boxes looked good, no banged corners or anything. The cardboard just had an awkward smell to it, but sometimes cardboard does that. I got the 240lbs of pressed wood moved to the floor and opened it. The packages were extra padded with styrofoam at the corners. But when I pulled the pieces out, the corners were looking like someone had dropped them. My happiness meter started to drop. 

Something that I didn't expect to take me too very long took two days. Now, I would like to take a moment to preface the rest of this post with the statement that I know what I'm doing when it comes to putting together store bought furniture. I know how to wield tool and put things together. I know the age old rule of "measure twice, cut once." I've built sets and props that had no instructions or pre-drilled holes. I'm no Bob Villa, but I know how to build.

But I would love to see anyone with knowledge try to build something that was obviously messed up at the manufacturers. My predrilled holes didn't match up, corners were busted, the laminate on the pressed wood was bubbling on one side, and the whole thing doesn't sit straight. And that's just a few things off the top of my head. What was suppose to be an awesome first adult purchase for myself slowly turned into the bane of my existence.

The finished cabinet without the doorknobs. Notice how it leans to the left a bit. Also notice how the doors aren't sitting right.

Yeah, those doors are not right at all. The right door barely even reaches the magnet to keep to closed. Not to mention the fact that the screws to hold the magnet in place on the inside aren't catching the wood and wiggle around.

In order to close the left door, I have to push up on the molding because otherwise it is too high up and hits the top.

The table on the inside gave me loads of grief. It took entirely too long to get the slides to go in right, but I finally got that part done. Only yo be met with the fact tat the table doesn't sit right and also leans, hitting the wall on one side.

Notice how it brushes against the wall. And not in a sexy dancing kind of brushing against, either. This is full on annoying brushing.


Meanwhile, the other side is pretending like its at an 8th grade dance where you hold your partner as far out from you as possible to the point that only your hands are touching shoulders or waist and you both refuse to look at each other while dancing in a circle.

This is the top of the armiore. Notice how it isn't flush with the molding. The good news is that it shouldn't be flush with the molding. The bad news is that its suppose to create a lip over the molding. This is more of an underbite. And the corner is banged up and warped.

Its a bit hard to see here, but the right side has an extreme overbite while the left side has the underbite. See, perfect instance where the predrilled holes did NOT match up. Not only that, but you can see where the middle shelf leans to the opposite side that the rest of the armiore leans. Which means my shelves only fit on that side from about the halfway mark and down.

Not only that, but the backing wasn't measured right and in order for me to get the sides to line up, it caused the corner to come up over the back. Someone that an exacto knife will fix, but still.

Crappy corner.
One of the worst corners. It came out of the box like this and there was no sign of damage to the packaging here.

So, these little guys are suppose to help protect the little leg things that you add to the bottom of the unit. I couldn't use them because they were warped and wouldn't fit. Because I couldn't use the, the bottom of the unit messed up when we tried to move it, but I don't have a picture of that yet.


So yeah. That's my adventures with this stupid armiore. I will be including a link to this blog post when I leave my review on the website, but I will also be writing a nasty letter to Walmart and the Manufacturer. Sorry if it was a long post...but I felt like it needed to be done.

Saturday, March 5, 2011

AHHHH


Sometimes I just feel like screaming like this little girl. 


Let's play a game, alright? 
Its called tipping anyone that performs some kind of service on you. 

And I mean that is the most family friendly of terms. Mostly because I don't know if you tip a hooker or not. Though, my tip would obviously be don't be a hooker. Yes, it worked out for Julia Roberts...But guess what? It wasn't suppose to work out for her. There was a different ending to the movies, kids. Yeah, that's right. The hooker wasn't going to get the millionaire.

Anyways. Just remember that tipping is a good thing.


Friday, March 4, 2011

The Crafting Days of Yore...

So I was sitting on the loveseat in my living room trying to decide what I wanted to blog about tonight. That's when I realized that my challenge to post in my blog once a day for an entire year could be in danger of just being completely ridonkulous and filled with posts about nothing. I don't want to just create a post for the sake of saying I posted. I want it to be more entertaining. Perhaps more inspiring. I don't know. But I wanted it to be more than just general dribble about why I couldn't come up with a better post that day.

Then I got to thinking about all the pictures I have taken over the years and how long I've been crafty. Now, I will admit, some of the things I created aren't that spectacular. But, I remember that at the time I created them, I was pretty tickled with them. It's amazing what paint and foam stars can do for your ego. lol

Here are some things that I've done in the past and would like to recreate at some point again if I ever get the chance. Or just tweak them a tiny bit. That could be a lot of fun right? All of these pictures were taken before Christmas 2001. It was my senior year of high school and I made a lot of my gifts for my friends that year. You will be seeing all the fun decorations in my room from then, I'm sure.


These were candle stick holders that I painted as a gift for someone for Christmas. I honestly do not remember who I made them for...But I thought they were super pretty. They were a maroonish pink color with a lighter pink and white trim, detailing, and spattering. 
(That large Ace of Diamonds in the background was a part of our senior homecoming float...WHICH WE WON THAT YEAR!) 
 I used a stencil for the first time to make this and I loved how it came out. Aren't they pretty?

 Here is a box that I painted of various blues for my friend. It was a carboard box with glitter swirls that I just painted in between. I thought it looked really cool. I remember who got this gift, though! :D


It is kind of hard to forget who got these three things, seeing as how her picture is right there and her name was on the pot. I was really into painted terracotta pots that year for some strange reason. I just remember thinking it was awesome. So I painted a good handful for people, thew their names on them, and pretty much called it a day. Though, I still kind of love them to hold pencils and what have you. This was a simple canvas picture frame, something that my awesome friend Jessica had gotten me addicted on my junior year of high school. I painted it black, threw on some glittery glazey stuff, then painted some extra stars, the words, and then glued on foam stars. It was so simple that I did the same on the box and clay pot!


Yea, some of these I wouldn't mind doing again. But I love being able to look back on the things I've made and go "Aww...lookit that!" Some of it makes me want to run to Old Time Pottery and buy some things to get crafty with again. Though, I'll admit that I have a whole notebook filled with to do crafting projects. I have a bad habit of starting something and never finishing it because halfway through I wanted to start something else because I was getting impatient. That being said, I really need to try and focus on the accessories for a long while before I decide if I want to get back into the painting or not. 

Though, there are some crafty bits that I try to stay FAR away from because I know it will only end in tears, excessive spending on supplies, and my roommate kicking me out because I'm a crafting hoarder. Are there any projects you guys would like to get started on but know it would be a bad idea?

Thursday, March 3, 2011

Gettin' my Etsy on!

Aww snap, son! Guess who finally opened up an Esty shop? Why it would be me. Yup, this girl right here. I'm super excited about this and I can't wait to have more pretty things to post up on the site and then start promoting it.

I'm not going to lie. I'm a sure newb when it comes to Etsy. I know how to buy something pretty and that's about it. And I know that I am not alone in this way of being on the awesome site. So I've been doing as much researching on the subject as I can. That being said, I wanted to link my readers to an awesome blog post I found about being new to starting an Etsy shop. Its a really awesome post and a bit detailed, so if you don't want to read it...then, well, you don't want to learn how to start your shop.

Honey Bear Lane is an adorable blog with the awesome run through that I was talking about. Check it out.


In other news, I will be hosting a pretty awesome nail themed give away in hopes of combining my Nail blog with this one and getting my followers from there to switch to here. Cross your fingers with me that it works, please.

Wednesday, March 2, 2011

Bucket List Beginnings.

I think I am one of the few people that saw "The Bucket List" years after it came out. I caught it on TBS on e night recently and couldn't turn away. By the end, I was bawling my eyes out with a new found inspiration lurking inside of me. I wanted my own bucket list. I wanted that feeling of living and experiencing things. I wanted to focus on the simple things that can bring a smile to my face and focus less on the negativity that creeps up on all of us for whatever reason. Life is for living...that's why its called life. And I'm ready to live.

I wrote my own "Bucket List" and tried to fill it with things that I knew I could accomplish at some point. I didn't want a list that I would look at later and be depressed because I couldn't achieve my listy goals. So, here's my list. I wanted to share it.

My Bucket List:
1. Start a project, stick with it, and finish it.
2. Visit Ireland.
3. Inspire someone.
4. Experience a relaxing spa day.
5. Work with a childrens theatre again.
6. See Sleeping Beauty's castle (Either the one in Disney or the one it was fashioned after).
7. Travel on a roadtrip stopping at little tourist trap places on the drive.
8. Make a three course meal completely on my own.
9. Find love.
10. Witness a miracle/see something majestic.
11. Attend a wine tasting.
12. Be able to someday introduce my old friends to my new ones.
13. Finish my book.
14. Accept more challenges.
15. Find my Christmas spirit once more.


Number one on my Bucket List is the most important for me. Rarely do I ever start a project for myself and finish it. So, Monday night, while I was making dinner, II came up with a project that I realy want to do. It allows me to start posting on this blog again, which was my first one and I kind of love it.

I have decided to challenge myself and you all get to benefit from it. Or, at least, I hope its a benefit for you guys. I've decided to attempt to blog every day for an entire year. Within those posts, you'll see me challenge myself at least once a week to try or do new things (Look, hitting number 14 on the BL). I'll post about my crafty endeavors, stuff about nails, and my cooking adventures. I'm hoping this will be awesome and that I can stick to it. I'm seriously going to try my hardest.

So, here's to hoping I can do it. I'm gonna need all the support I can get.